The CBR600F3 and '94 F2 forks are rebound adjustable cartridge forks, which are better than the stock Hawk forks in every way except complexity and cost. This becomes somewhat less true if you've got well tuned Hawk forks with Racetech cartridge emulators, decent springs, and the right fork oil. Except for style points, or if you're a racer (a good one) I'm not convinced that the upgrade from a tuned Racetech'd Hawk front end to an F3 front end is worth it. If you've got a stock front end, it's definately worth it as good F3 forks can be had on eBay for about the same cost as emulators and springs, sometimes a lot less than that.
However, the F2/3 forks are not a straight up bolt on. The fender mounts, brake caliper mounts, and speedo sender mount are different, and not in a good way.
This means that you have to mix and match parts.
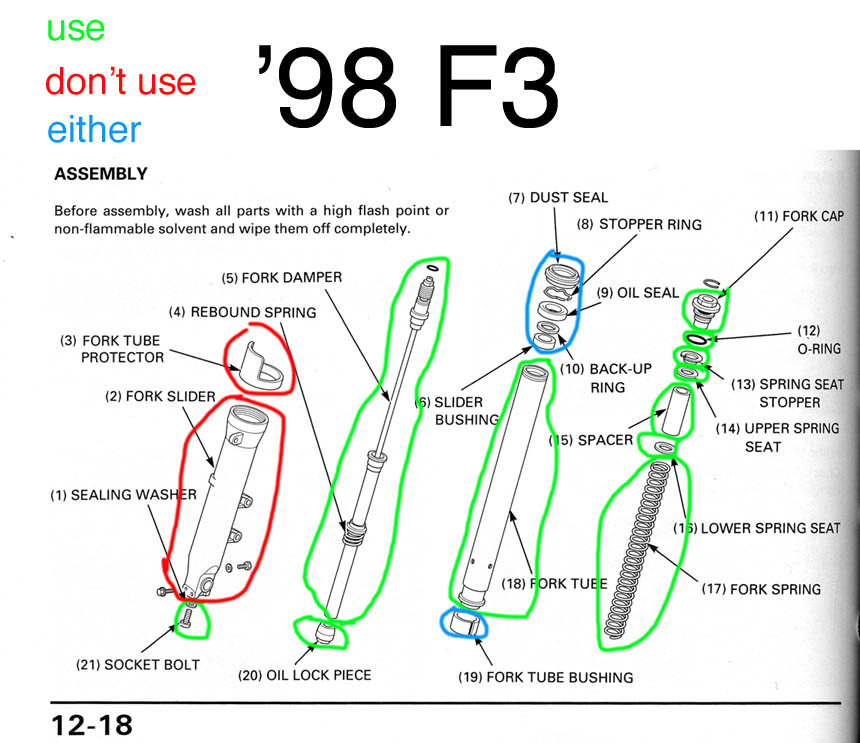
What you use:
Remove the fork tube cap.
It will come out only a little bit, and you'll notice that the cap is held onto the fork by a bunch of stuff. DON'T FORCE ANYTHING!
Pull the spring and the spacer down while pulling the fork tube cap up. When you lift the damper rod some fork oil will come out from around the fork tube cap. This is by design. That's where the rebound damping happens.
On the very top of the spring/spacer stack there's a "C" shaped washer with a dent in it. take this out and put it aside.
With a 14mm wrench, hold onto the bottom of the preload adjuster and unscrew the fork tube cap from it. Note when putting this back together that there is no torque spec on this, it's how the preload gets adjusted, so don't tighten it at all.
Once the fork tube cap is off, you can remove the two washers, the spacer, and the spring.
For fun, pump the damper rod up and down some. Now turn the damping to full-hard and do it again. It's a good way to really grok how things work.
Pour out the fork oil into your favorite Haz-Mat container. Pump the fork tube up and down a bunch of times, and pump the damper rod too. Oil will come out when you do this. Get as much out as you can, because any you don't get out now will end up in your ears and all over your workbench and all over your face and probably some will end up in your underwear. This isn't fun. Fork oil is pretty gross.
Ok, now use the small flat screwdriver to pry off the dust seal. Take your time, and work your way around the seal. Be very careful not to let the screwdriver touch the fork tube, because any scratches/nicks will make the tube leak, and that's bad.
Once the dust seal is no longer seated, slide it off the top of the tube and set it aside, you'll probably use it later.
Take your 6mm Allen wrench and put it in the vice, with the long part pointing up. Put the fork leg down on top of the Allen wrench so it seats in the damper rod bolt inside the bottom of the fork leg. Grab onto the fork slider and turn it counter-clockwise (looking down). It might take a lot of force.
Once the the bolt is loosened a little, take the Allen wrench out of the vice and take the fork leg and wrench over to the oil-disposal-place. When the bolt comes out it will be messy, so you might as well let it drip into the oil bin instead of into your underwear.
Remove the Damper rod bolt. You may need a helper to pull up on the fork tube while you turn the Allen wrench, as the damper rod might turn inside the fork slider. Pulling up on the fork tube puts some resistance on the damper rod via the top-out-spring.
Remove the oil seal retaining ring with the small screwdriver. Be extra careful not to hit the fork tube! you should be able to pry the retaining ring out pretty easily, lift it in and up a bit, and once one end is free work it around the fork slider until it comes free. Set it aside, you'll want it later.
Once the bolt is out the whole thing can come apart.
Remove the damper rod and set it aside, you'll want it later.
The way to separate the slider and fork tube is to use them against each other like a slide-hammer. Seriously. Slide the against each other and the oil seal and upper bushing will come out. It might take more force than feels right, but be patient, and don't overdo it. Lots of small taps is better than a few really hard ones. Do it just hard enough so you can tell that the parts are moving.
When they come apart you should have:
If you're the type, now would be a good time to clean all the parts with a high flash point or non-flamable solvent, wipe them off, and let them dry.
Do the whole thing again to the other fork leg.
Keep track of all those parts, you'll need them later, and don't want to get them mixed with the similar-looking hawk parts. Be carful where you leave the fork tubes, as they're the ones you're keeping, and they can get knicked or scratched if they fall onto concrete or tools.
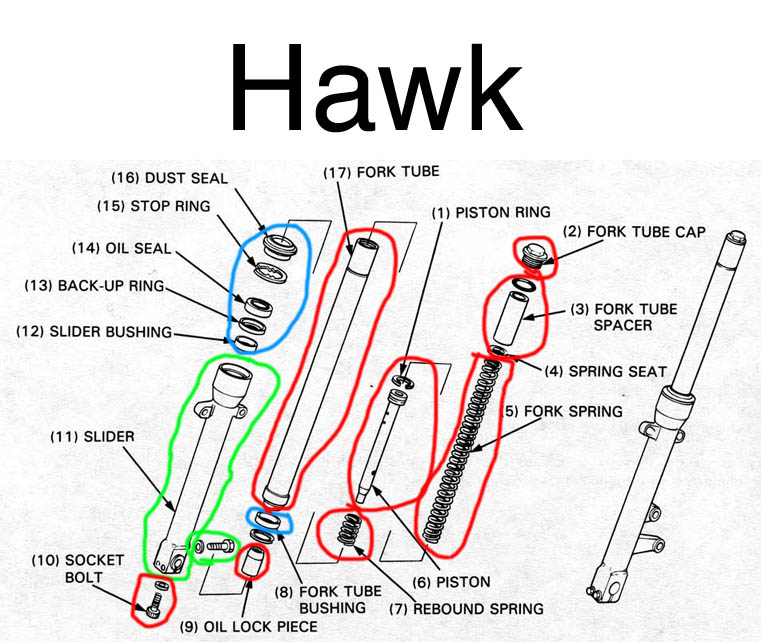
Disasemble the forks according to the manual. The only bits you'll be re-using are the fork sliders and maybe the bushings and oil/dust seals if they're in better shape than the ones from the CBR.
and slider bushings, and